****I apologize for the very late update. Life got in the way, and I was shoved in a dark corner. I’m sort of ok now, so part 2 is finally here.****
For my 2nd day at Kamakura, I woke up early and had breakfast at the hotel’s restaurant. I originally wanted to rent a bike, but as I do bring clouds wherever I go (according to my friend), it was a rainy morning and not an ideal weather for a bike ride.
Luckily, Kotoku-In Temple was very near and can be accessed by walking. Google maps said it was a 15-minute walk from the hotel, but I got lost for a few minutes, so it took me twice as much to reach the temple grounds. XD
Kotoku-In is famous for the Giant Buddha sitting on an open area. Entrance to the grounds area is¥200 and you can also enter the Buddha for only ¥20. Of course, for ¥300, I got another temple stamp to add for my collection.
After a couple of hours of waiting for the temple stamp and taking photos, I head out to my next destination: Zeniarai Benzaiten Ugafuku Shrine.
There was no entrance fee for this shrine, but getting there was a bit of a trek. The grounds are located on the mountains, and you’d have to do a little hike to find the entrance.
The grounds was small by comparison to the other shrines I’ve been to, but it felt cozy and intimate. Immediately by the entrance, you can see the monks signing the shrine stamps (which I also got).
Zeniarai’s famous landmark was the miraculous spring flowing inside a cave shrine. It was said that if you wash your money in this spring, it will blessed and multiply. Of course, I had to give it a try!
After exploring the grounds a bit, I bought a bottle of ラムネ at one of the food stalls inside the shrine. I also found a small trail leading to a cafe (name), but it seems it was closed when I got there. Maybe I will try to go there next time.
As it was still early, I decided to go out for lunch before heading to the next shrine on my list. Just 20 minutes away from Zeniarai, I found Akari Dining with its humongous karaage.
After lunch, I walked a few minutes more to Tsurugaoka Hachimangu Shrine. The thing that amazed me most about this shrine was its impressive torii gate which was located a few blocks away from the main grounds.
It took a few minutes of leisurely walk from the giant torii to the main shrine grounds. Past the gate, there were three bridges: an arched one on the center and flat bridges on both sides. The arched bridge was closed off when I got there, not sure if it was just a temporary closure, so everyone used the flat bridges on either sides.
Inside the grounds, almost everything was color red. Even the ema tablets were designed as small red torii. The main shrine was accessible by climbing a long set of stairs.
There were also small pathways covered by multiple torii leading to smaller shrines. A pair of Japanese girls wearing traditional summer kimono even asked me to take their photo beneath the torii. It was a magical moment for me because I was able to understand their Nihongo, and I was able to reply with the same language. 🙂
After exploring the grounds, getting a shrine stamp, and taking photos of the koi at the ponds, I was a bit tired. There was a small canteen near the entrance where I bought souvenirs (お土産) for the office, and a refreshing melon ice (メロンかき氷) for me.
This was supposedly the end of my day 2, but I still had time to spare and Houkai-ji Temple was less than 10 minutes away.
There was a fee of ¥200 to enter the forest-like grounds. There weren’t a lot of people there and it felt very serene and calm. The main hall was open for visitors for praying and temple stamps. It was only the second time I got to see the inside of a temple’s hall, and it was quite surreal.
On my way back to the hotel, I took the Enoden Line from Kamakura Station to Yuigahama Station. It was still early, so I hang out at the beach and even tried to swim (it was hard- the waves were still too high). After sunset, I went back to the hotel to change and went out again for dinner. I was craving for ramen, and I was really glad when I found a small Chinese restaurant where I got these:
And with that, my vacation at Kamakura ended. 🙂
I am now looking forward to my next vacation and adventure. Talk to you soon! 😀
It’s summer! Or at least the calendar says it’s summer. XD
Due to several typhoons around Japan sea, we are experiencing rainy weather for several months now. Luckily, there was a break last week – both with work and the storms – and I got to visit one more place on my bucket list.
For my Kamakura adventure, I planned to explore the beach and the surrounding areas for two and a half days. I booked a bed at WeBase Hostel near Yuigahama Beach so that I can have easy access to the sea. Below is the itinerary I prepared for this trip:
Kamakura in Kanagawa Prefecture is merely a 2-hour travel from where I live. If you are within Central Tokyo, you can cut that travel time in half. It is located at the south-most part of Kanagawa and is famous for it’s long line of beaches and the Giant Buddha.
Kamakura, Kanagawa Prefecture
From Toyoda to Kamakura, I took the following train route:
JR Chuo Line from Toyoda to Hachioji
Yokohama Line from Hachioji to Yokohama
Yokosuka Line from Yokohama to Kamakura
Enoshima Dentetsu Line from Kamakura to Yuigahama
And I just reversed the route on my way home.
All in all, I spent a little over ¥2600 for the roundtrip train fare – which was less than my original budget. Yay!
From Yuigahama Station, WeBase Hostel was a mere 3-minute walk under the burning summer sun. Without checking my map, I followed the flow of tourists and soon found the hotel a few steps away from the main road and the beach.
The staff were very friendly and spoke English. Since the actual check-in time is 4 PM, I left my bag at the front desk and went on the main objective of the day: Hase-dera Temple.
Hase-dera Temple was just 15 minutes away from the hotel. I decided to walk so that I could find a restaurant for lunch before exploring the temple. Near the Enoden line, I found a shop that offers Kamakura’s famous “shirasu” or whitebait fish – which my office-mates suggested for me to try at least once.
So, I ordered a bowl of udon (my favorite) with tempura and shirasu toppings:
It was good, but honestly, it wasn’t my cup of tea – so to speak. But at least, I gave it a try.
Hase-dera or Hase-kannon is a Buddhist temple and is famous for housing of the largest wooden statue of Kannon in Japan .
The temple itself was a sprawling landmark with multiple stairs which would lead you to different areas and offer different views. For only ¥400 as entrance fee, you can explore this temple as long as you want.
I planned to try making a Shakyo as I had seen on the website. But due to time constraint (I was one and a half hours behind my schedule), I wasn’t able to do so.
I did explore the small museum where, of course, photography is not allowed.
I went back to the hotel just after the temple’s closing. I planned to swim a bit at the beach, but the waves were kind of high and I got scared. LOL.
So, I just stayed at the beach and waited for the sunset. Fun fact: the sun doesn’t set on the sea’s horizon line at Kamakura. It sets on the opposite side among the houses and buildings.
After having my fill of the salty air, I went back to the hotel to clean up and have dinner at the restaurant. Unfortunately, I’m very picky and they have limited items on the menu. I decided to try one of the restobars at the beach line. It was fun to have a simple dinner of grilled chicken and drink lemon sour while listening at the sound of water.
I wanted to hangout more at the beach, so I tried a different bar, but all establishments didn’t accept new customers after 8:30 PM. In the end, I had one more drink at a bar near the hotel, and called it a night.
Will share more of my adventures at the next post. 🙂
Hi! I’m back. I recently got very busy with moving from Aichi to Tokyo. And I also had to do training for my new type of work! Anyways, as promised, here is how you can have your very own Maiko/Geisha Experience in Kyoto.
First off, what is a Maiko/Geisha?
A Geisha is a popular and important part of Japanese culture. They are the women who entertain by performing traditional songs, dance, and art. A Maiko, or apprentice, is considered as the peak of Japanese beauty and femininity. And contrary to popular belief, maiko and geisha are not the Eastern equivalent of prostitutes. They are artists trained to perform and preserve traditional arts.
*photo is not mine*
It takes years of school, training and real-life practice to be promoted from maiko to full-fledged geisha.
Thankfully, you can have a taste of at least a little part of this important heritage through a make-over experience.
*photo is not mine*
Gion Aya Make-over Experience offers ladies of all ages the chance to feel like a traditional geisha or maiko for a few hours. You can check out their website and make your own reservation here.
So, after making and confirming your reservation, you’ll need to arrive at the shop at least 10 minutes before your schedule.
Before the make-over, you’ll have to sign forms (English translation are also written). You will also have to choose at least 4 poses from their guide book. Every season, they offer special poses and props, so make sure to try them at least once.
Next stop will be the dressing room. Undergarments are allowed, but everything else will be put in a locker, including jewelry. Phones and cameras are placed in a small bag you can carry along the stages of the make-over.
They will provide you with a kimono undergarment and a pair of tabi (socks). If you’re a first-timer, there is a poster in the locker showing how to properly wear these clothes. If still unsure, you can ask the staff to help you. They are all very kind and speak English.
tabi
After changing clothes, you will be escorted to the make-up room. One suggestion: try to go to the toilet before this stage – you’ll thank me later. (^_−)☆
In the make-up room, you’ll be introduced to your make-up artist/dresser. In my case, it was Yukiko-san, a kimono-dresser instructor in a nearby school. She can understand and speak English well, so I had no problem with communication.
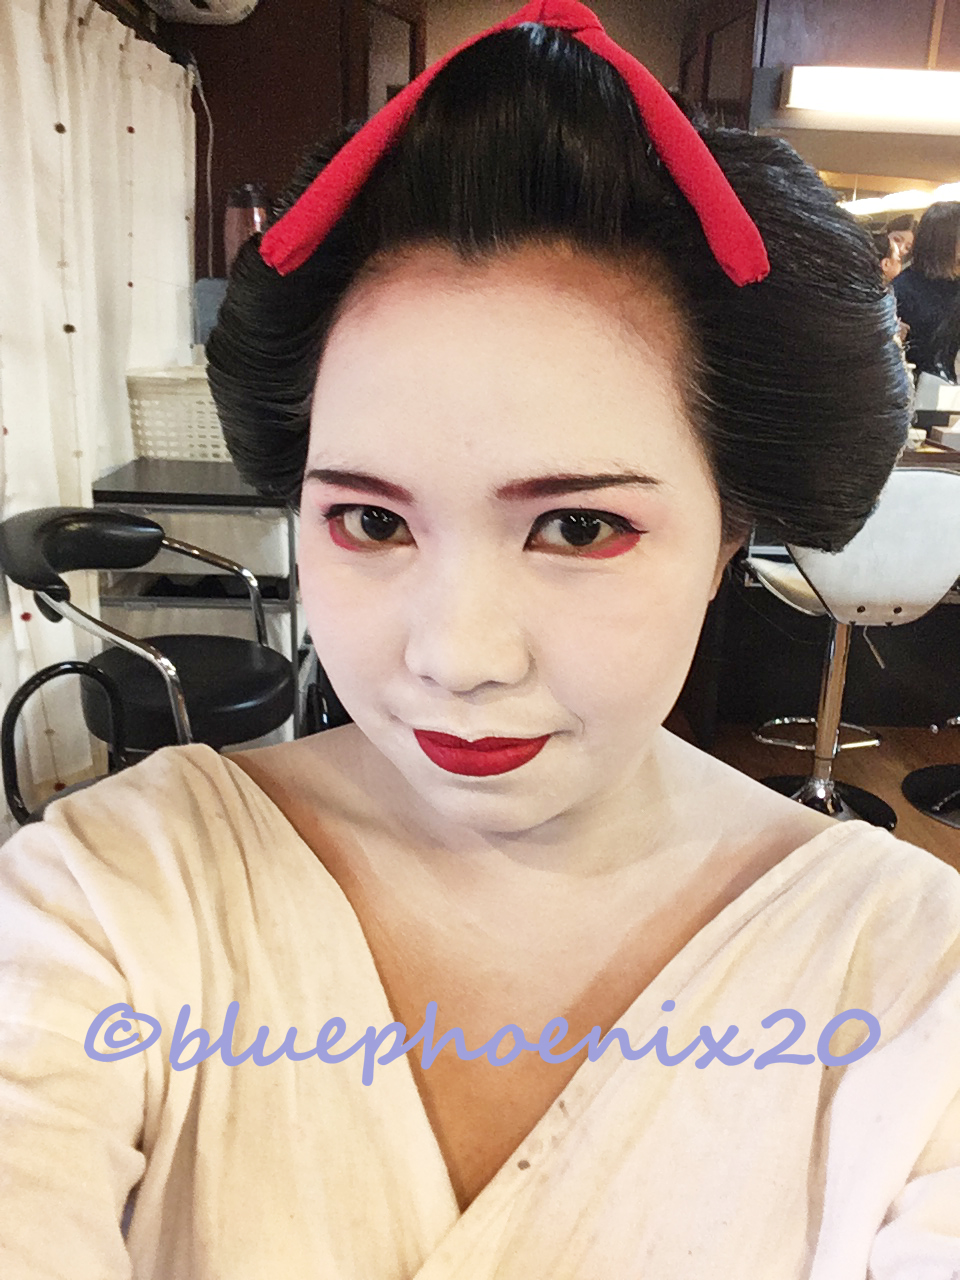
Yukiko-san gave me two options for make-up which will suit my round face: kawaii (cute) or elegant. We both agreed that softer make-up will look good on my features (round face with small round eyes, full nose, and full lips) so, we opted for kawaii. Turns out it means that I’ll be wearing a lot of pink on my face!
Maiko make-up is quite difficult to explain, but I shall do my best:
Hair was bundled and secured with a mesh net. Since my hair was a bit long, a portion from the front was separated to be used later on the wig.
A layer of wax was first applied to protect the skin. It smelled a bit bad, but it was important so that the skin wouldn’t dry under layers of foundation.
White liquid foundation was applied around the upper face. Even the eyebrows were covered with this foundation. A thin space before the hairline was left as was traditional.
Eye make-up was next. I’m not sure what Yukiko-san used, but there were eye shadows of different shades of pink and red. Then I had to keep my eyes closed while she applied very cold liquid eyeliner.
While waiting for the eyeliner to dry, thinner eyebrow lines were drawn over my original eyebrows. She used a combination of black, brown and red to tie it all in.
Then the rest of the face is covered with the same white foundation (including the lips!). The distinct 3 triangle patterns of a Maiko were also drawn at the back.
To finish everything else, bright red lipstick was applied on the lips. As was in the old time, the bottom lip was fully red, and only a portion of the upper lip was painted. This gave the illusion of fuller bottom lip than I originally had.
The make-up process took about 30-45 minutes at least. There were many layers and retouches as the foundation dries. But I think it was all worth it.
Full disclosure: I am allergic to make-up. But, I really wanted to do this. 😛
After the make-up, the wig is attached next. The wig they gave me was arranged in wareshinobu hairstyle, which was what traditional maiko used to wear on their formal debut. The wig was sewn on the mesh net cover to keep it in place. The front part of the wig was covered by my real hair which was pulled and secured using bobby pins. Yukiko-san had to use a black dye spray to hide the brown streaks of my hair into the wig.
Wig and real hair. Heavy wig.
Of course, true maiko and geisha did not wear wigs. They had really long hair that was arranged into intricate and symbolic styles befitting their status. According to Yukiko-san, maiko/geisha had their hairs styled washed and styled only once a week year-round, and at least thrice a week during summer. The rest of the time, they had to keep their hair up at all times of the day. Talk about dedication!
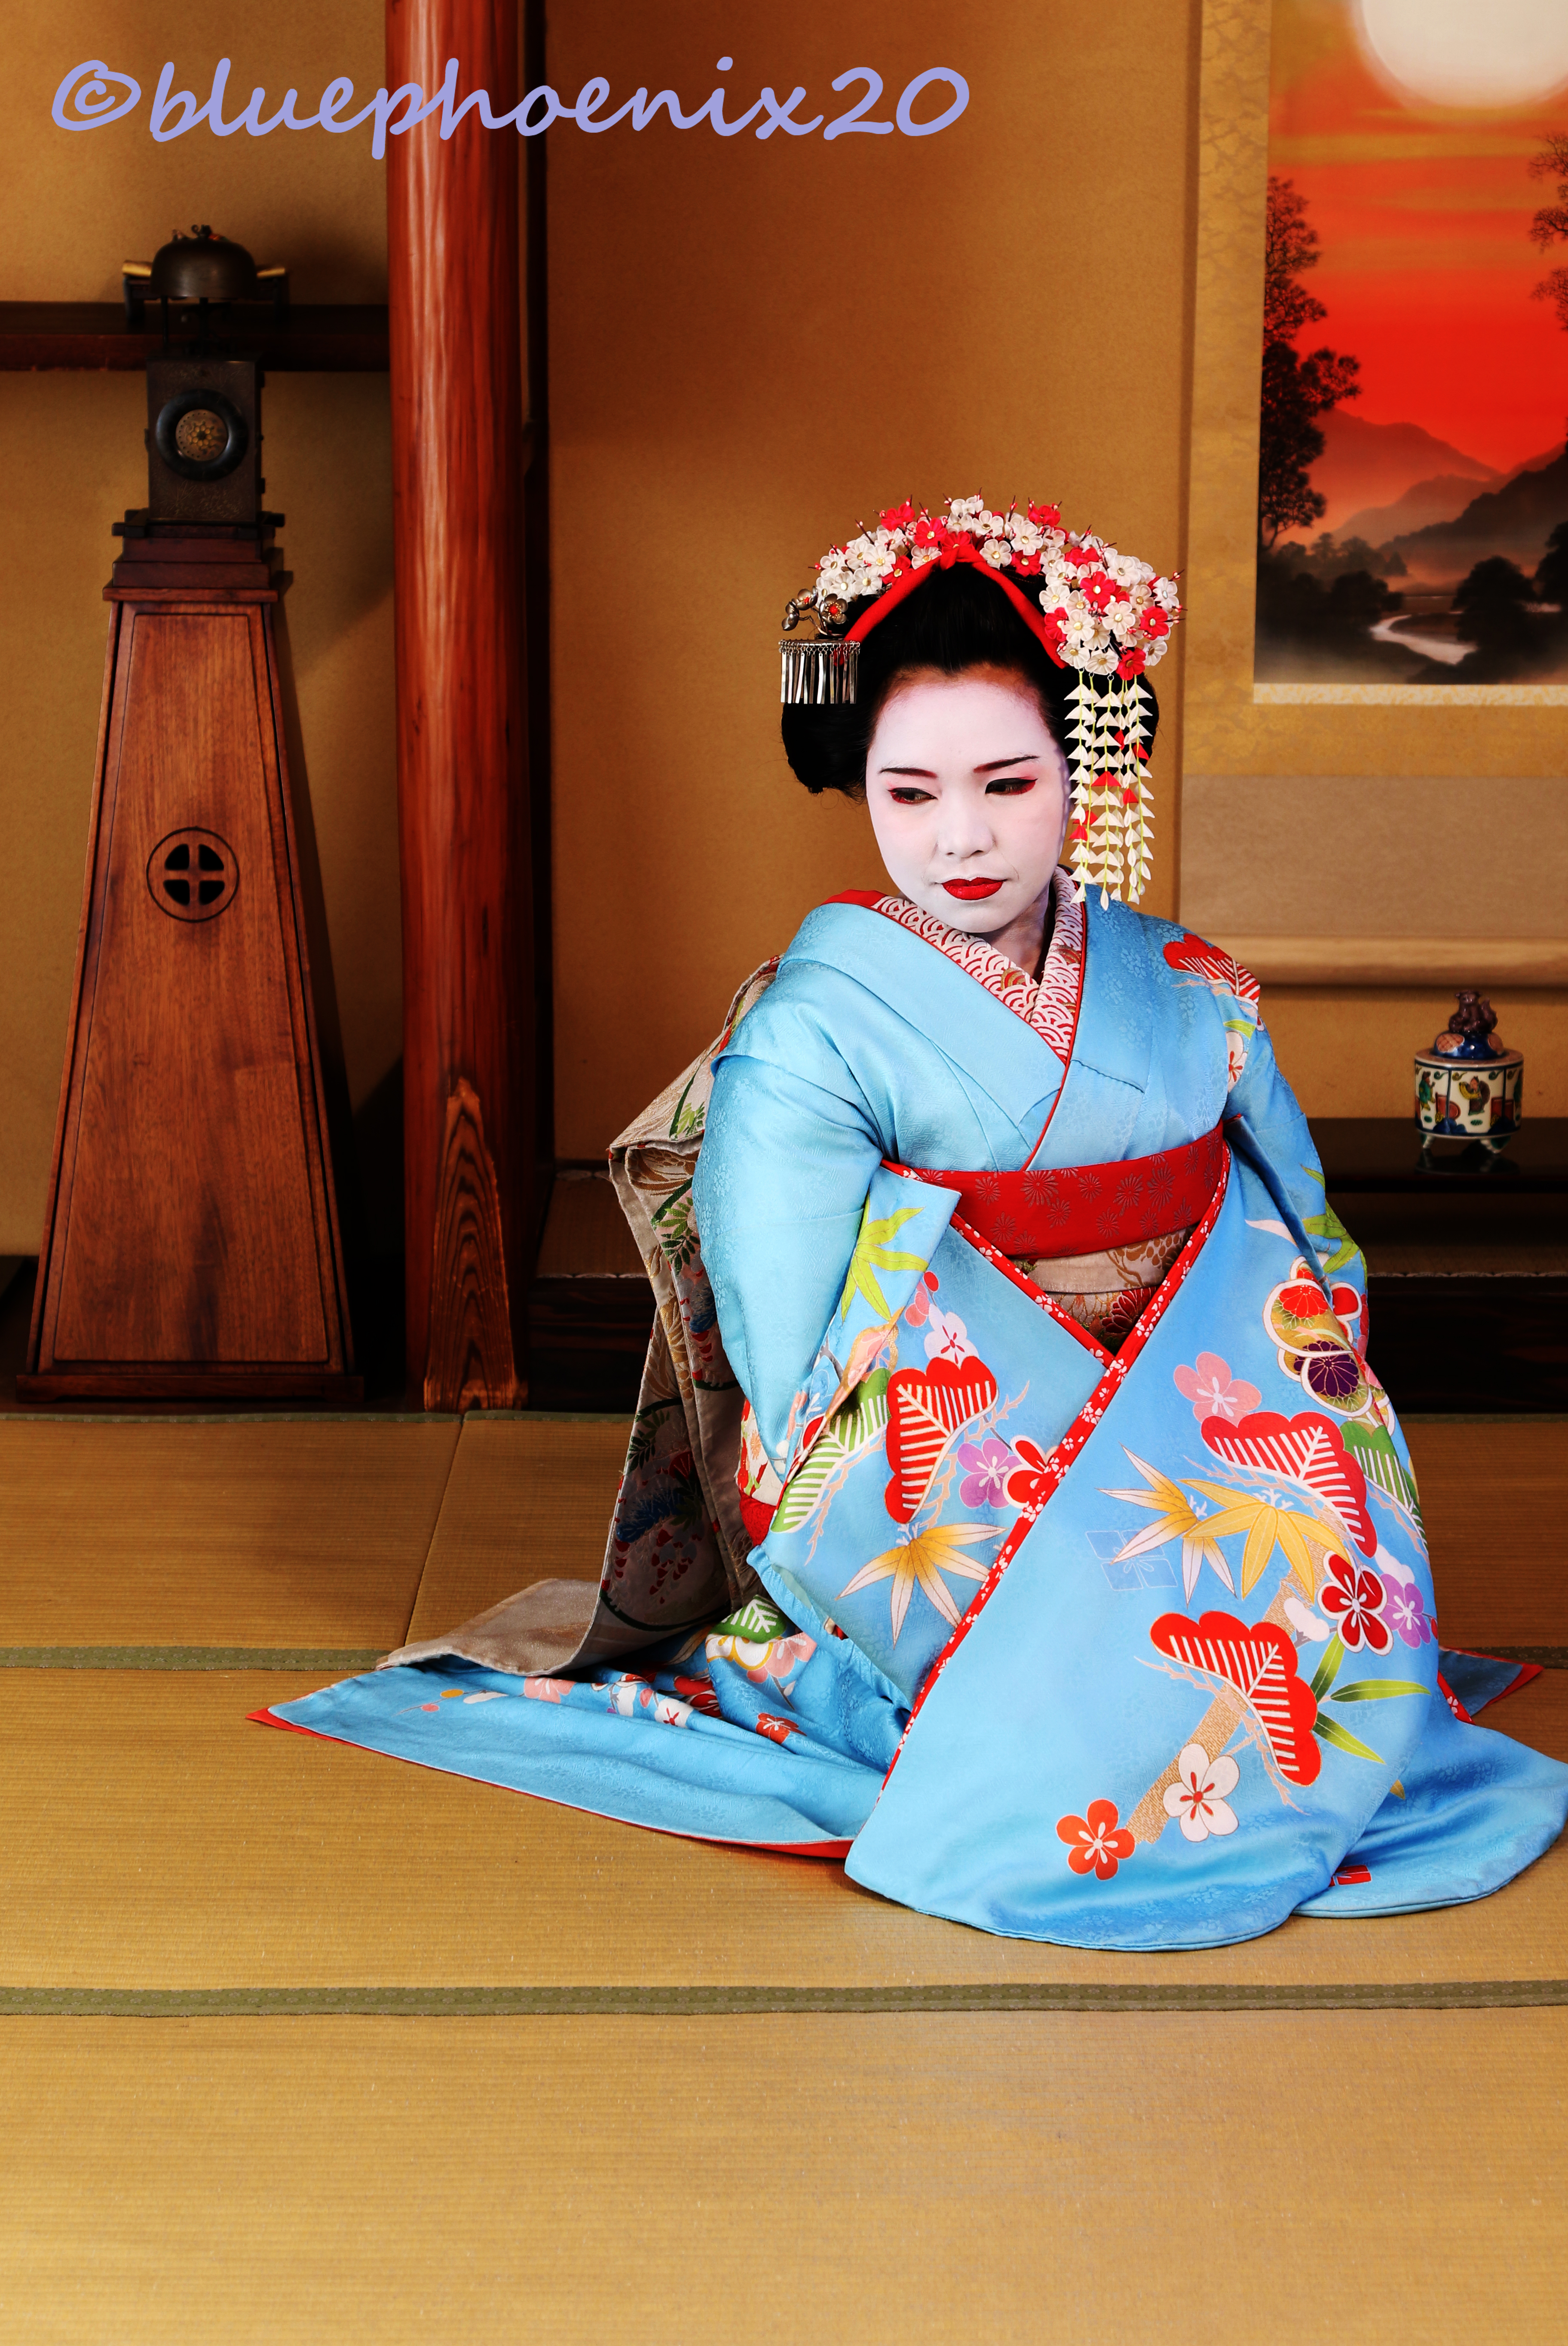
Finally, it was time to put on the kimono. All I had to do was stand still, while the dresser did everything else. As with the make-up, putting on a formal kimono is an intricate task with lots of layers (literally!):
A half-slip cover was placed on top of the kimono undergarment.
Then a hard collar was attached around the shoulder. This will hold the shape of the kimono later on, and show the triangle marks at the back.
I’m not quite sure what it was called, but layers of padding were wrapped around the waist and secured with strips of cloth.
A thin white kimono with a red and gold collar was worn over everything.
Then the silk kimono (of your choosing) was next. Formal kimono has long sleeves, and the hem goes over the feet. This was also secured with strips of cloth.
A small padded pillow was placed at the back. It will be used to create the drum design of the obi.
Next up is the long (and I mean LOOOONNNGGG) obi. It was wrapped around the waist multiple times and secured at the back. After it was wrapped, we noticed that my body looked straight and flat (I am quite curvy and full-bodied). Yukiko-san joked that to wear a kimono, you have to accept looking flat-chested. LOL!
The long obi was tied at the back over the padding. Then a smaller obi with contrasting design was tied around the waist. Lastly, a decorative belt cord was placed over the obi.
Final touches were the hair ornaments. Since my birth month was February, Yukiko-san suggested plum blossoms pins.
plum-blossom hair ornament
Dressing probably took another 20-30 minutes and I think I was wearing at least 10 layers of cloth after all that. There were certain rules on how to wear formal kimono, like which side to put inside and how to properly fold the excess fabric. Good thing the dressers at Gion Aya are all professionals at this. They will help you select the best style and color of kimono, and dress you up deftly and efficiently.
After dressing, it was time for the professional photographer to take the pre-selected photos. The studio was like a formal teahouse, with extra space for close-up shots.
the cold winter air was blowing through the open window
I admit I am not very good at posing pictures. But with the help of the photographer, Mayumi-san, I think my photos came out quite good. She directed me where to sit, stand and look. It was actually fun!
She took at least a dozen of posed photos and two candid shots. For the package I chose, 4 of those poses were printed, and everything else were saved in an USB device. One candid shot was printed in wallet-size and I was asked to write a message on it. This would be added to their guest book along with all their clients’ photos.
Full formal kimono with teahouse backdrop
After the professional photo shoot, I was given 10 minutes of free time. If I had a companion at that time, maybe we could do our own photo shoot anywhere. But I was by myself, so all I could take was a lot of selfies and videos. Mayumi-san was kind enough to accompany me for a few minutes and took some photos of using my phone. XD
After the free time, another staff helped me to undress all the layers of the kimono. Then I was led to the locker to wash my hair and face. I had to use a lot of baby oil and cotton wipes to completely remove all traces of the thick make-up. I also had to wash my hair over the sink, which was a little uncomfortable.
When I was dressed and back to my old self, I just had to wait for the printed photos and soft copy. In the waiting room, I was accompanied by the other guests’ male companions. Since the guys only need to change clothes into traditional male kimono, they had to wait for their ladies to finish make-up and put on the layered formal kimono (a good hour or so).
It was a funny sight, actually. It was a good thing the waiting room had a lot of outlets and free puzzle games. (^v^)
After I received the printed and soft copies, all that was left was payment. For the package I chose, I spent around ¥15,000 which I paid using credit card. Different packages have different rates, and you can also have other add ons. You can check out Gion Aya’s prices here.
I truly believe that a Kyoto adventure wouldn’t be complete without trying this. And I highly recommend Gion Aya for a greatly memorable experience. This is one of the best moments in my life, and I am really glad I got to do it in my 20s. LOL!
So, don’t forget to include this in your Japan adventure itinerary. 🙂
On the 3rd day of my solo adventure, I decided not to make a fully detailed itinerary, but just go with the flow.
So, I woke up later than the first 2 days and enjoyed my time at the library-style hotel. I had coffee (which costs 400 yen on IC) and read Agatha Cristie’s Murder is Easy. Unfortunately, I didn’t finish the book.
When I felt like my feet could walk again, I checked out of the hotel and headed to Nara. I’ve always wanted to see the famous free-roaming deer at Nara Park since my friend went there a few years ago.
So, from Book and Bed Kyoto, I rode the Keihan Main Line to Yodoyabashi. I got off Tambabashi station and transferred to Kintetsu Line. When I got to Nara station, I left my luggage at one of the many coin lockers available and walked to Nara Park.
As I was walking towards the park, I saw a shrine with many tourists milling around. So, I took a slight detour and took some photos of the beautiful pagoda. I also saw some deer just chilling around the shrine.
5-storey Pagoda
“don’t mind me… i’m just chillin’ here..”
Without looking at my map, I followed the flow of the crowd towards the central area of the park. Some deer were also following the people. The interesting part was that when the people stopped at the pedestrian crossing, the deer did the same. And when the light lit green, deer and human both crossed the street safely. It was a quite an amazing sight.
Around the park, vendors were selling crackers for 150 yen a bundle. Of course, I bought one bundle and the deer started to follow me. They were sweet and gentle, even when they were trying to get the crackers from my hand. I was lucky to get a close-up photo with one doe that followed me while I was walking through the park.
Rare closed-up photo with a doe
You can generally determine the gender of the deer. The does (female) have smaller bodies and without antlers. The bucks (male) have sawed-off antlers to make them safer to approach especially by children.
After enjoying the company of these sweet creatures, I decided to go into the Nara National Museum where I saw a lot of artifacts relevant to Japanese culture. Unfortunately, photography was not allowed inside the museum, so you’ll just have to visit it yourself to really feel the experience.
The national museum has 2 levels, and 1 annex. You can enter in either buildings and use the underground passage to cross to the other. There were also toilets, lockers and a cafe in the underground passage.
The museum contained paintings, sculptures, scrolls and other artifacts which told the history of Japan. The annex was dedicated solely to Buddhist sculptures and paintings. It was a fun experience to finally see the things I learned in school like the different kinds of potteries (i.e. celadon, song, han), bronze collections, and lacquered boxes.
It took me an hour or so to see all the displays. I tried to read all the descriptions, but it was kind of hard to keep all the information in my head. If you visit the museum and you don’t like to read too much, audio guides are available for rent at the reception for 500 yen. The display markers have numbers on them so can easily skip through the audio guide.
After digesting too much brain food, I felt that it was time to digest actual food. LOL!
Outside the museum, there were food stalls and restaurants offering a variety of food for the hungry stomach. Since the restaurants have longer waiting time, I opted to buy from one of the food stalls.
I did not regret my decision. For 500 yen, I was able to buy these humongous breaded chicken (torikatsu).
500 yen worth torikatsu
After my very late lunch, I still have a lot of time to spare. I once again followed the crowd towards The Great Buddha Hall. I bought tickets for both the hall and the Todai-ji Museum for only 1000 yen.
Photography was allowed inside the Buddha Hall, but not in the museum.
As the sun sets, I decided to buy the souvenirs for my friends and colleagues. Since the bus to Nagoya won’t arrive until 1:30 am, I went back to Kyoto City and stayed in Tops Cafe to try to nap until around 11 pm or so.
I celebrated New Year at Nishiyama Tennozan Station all by myself. LOL!
And that’s the end of my very first 3-day solo adventure in Kyoto and Nara! It was an exhausting journey, but the experience and memories are worth all of it. This might sound like a brag, but I am very proud of myself that I was able to do this on my own. Years from now, these will be some of the best moments of my life. 🙂
Some tips for those who wants to go to Kyoto and Nara:
If you are confident about riding buses, you can save a lot of money if you buy Kyoto Bus Pass. For 600 yen, you can ride all Kyoto buses for the whole day! (I wasn’t confident, so I didn’t do this.)
Kyoto has a lot of shops that offer Maiko-Geisha experience and tea ceremony. Do your research about which one you’d like to go to. Most requires advanced reservation online or by phone.
If the make-over experience is too expensive for your budget, you can still try feeling like a Japanese by renting a Kimono or Yukata. Prices may depend on the season and rental duration.
Bring cash. Some stores and activities do not accept credit cards. Be prepared with cash and coins.
Nara is a beautiful place to explore. Try to reserve at least 1 day to see it. The best time to see the free-roaming dears are at morning or noon.
If you can, try staying at a ryokan (hot spring inns) so you can also enjoy the experience of bathing at onsen. There are certain rules to follow though, so do your homework.
And that’s it! I hope you enjoyed the tale of my journey. I’ll be posting detailed information about the maiko make-over and tea ceremony experiences soon. Look forward to that.
PS. I am starting to research details for either Golden Week or Obon vacations. If you have any suggestions, feel free to comment below. 🙂
Day 2 of my solo adventure started with checking out of First Cabin Kyoto Arashiyama and going to Book and Bed Kyoto in Gion.
When I started planning this vacation, I originally wanted to stay for 2 nights at Book and Bed Kyoto. However, one night at that hotel was at least 6000 yen and I really couldn’t afford that. So, I booked the hotel for 1 night only.
Going to the hotel was easy enough using Google maps. However, when I arrived at the location, I only saw a nondescript building with a bakery on the first floor. It took me a few minutes to find the sign pointing to the hotel which was at the 9th floor of the building.
On the 9th floor, there was only a blue door with a book page serving as the logo. The staff was kind and spoke English. I left my luggage until the check-in time at 4pm and went on to my next stops.
Kyoto Tower
I have a fear of falling from high places. But I also have this weird urge to climb towers and anything high. I guess, I like the adrenaline rush? LOL. So, Kyoto Tower was definitely included in my itinerary.
To reach the observation deck, you’ll need to enter the Kyoto Tower building and buy tickets on the first floor. The ticket costs 770 yen, but it also includes a discount coupon for the public bathhouse located at the tower basement (B3F). You’ll then go to the 3rd floor where the elevator to the deck starts. The observation deck is on the 11th floor and has a lot of free binoculars, and some souvenirs for sale. There’s also a mini shrine where you can read your fortune.
Kyoto was an amazing view from 100m above ground. You can really see the mix of old and new buildings. It even snowed for a few minutes while I was at the observation deck. I decided to get one of those medallion souvenirs with name and date stamp.
The medallion cost 500 yen, the key chain was 200 yen, and the name and date stamp was 30 yen. A little expensive for a key chain, but I figured it’s a good remembrance of my time there.
Kyoto Tower medallion
After that, I had lunch at Kyoto Tower Sando, which is a food hall at the tower basement (B1F). There were so many food choices, both Japanese and international cuisines. I tried the pork cutlet from Katsukura which I forgot to take a photo of (I was hungry… sorry).
My next stop was at Gion Aya Maiko Experience. I decided to take the bus as it was the fastest option. However, it was the wrong move and added reasons why I don’t like taking the bus. I took the Bus 206 from Kyoto Ekimae stop. It was supposed to head north towards Higashiyama Yasui. However, it took the opposite route and I had no choice but to get off the next stop. My appointment at Aya was at 1pm and it was nearly 12:30 pm so I just took a taxi and barely met my appointment time.
Gion Aya was a quaint little shop that provided Maiko or Geisha make-over experience. For a small fee, you can transform into the doll-like ladies of old Japan complete with hairstyle, make-up and formal kimono. I’ll post a complete transformation experience in the next few days. 🙂
Maiko experience
The Maiko experience took at least a couple of hours from start to finish. Afterward, I had a little inner debate as to where I should go before my next cultural experience at 6pm. I saw a little shrine near Gion Aya, so I took some pictures while taking shelter from the rain.
Yasaka Shrine
Since it was barely 4pm, I decided to go back to Book and Bed Kyoto to check-in and rest my feet. The hotel didn’t accept cash, so I had to pay using either credit card or IC. The 6000 yen fee covered the booking and tax. Sleepwear, towels, toothbrush and bathroom products were extra charge. Good thing I brought my own so I was able to save some money.
Book and Bed Kyoto
The actual sleeping area was just a small capsule around 1x1x2 meters hidden inside the bookshelves. Curtains were for privacy. There was a long couch around the whole area where you can rest, eat, and read books.
I rested and read a book (of course) for at least an hour and a half. When my feet were ready for another walk, I went to Tea Ceremony En where I scheduled a group demonstration of a traditional tea ceremony.
Wagashi and Matcha
It was an hour of lecture and demonstration. Since it was a group demo, I was joined by a family from Italy, a couple from Korea and a group of friends from Canada. I was the only solo traveler from the Philippines and I had the luck to become the demo’s “principal guest” – which meant I got to taste the green tea made by the master. Yum!
After the lecture and demo, they gave us wagashi (Japanese sweets) and taught us how to mix and drink our own matcha. It’s a bit more complicated than I thought, so I’ll try to explain the whole process in a different post soon.
After drinking lots of tea, it’s time to find dinner. I found a small shop near my hotel that offered Kyoto-style okonomiyaki.
Kyoto-style Okonomiyaki
It was good. Although it had far too many green onions for my taste. It was cheap, though and the atmosphere of the shop was very Japanese. I had to wash away the onion taste and what better way to do that than having matcha dessert?
Shiratama Parfait
After dinner and dessert, I finally headed back to the hotel to continue reading the book and go to sleep. I thought the small sleeping quarter would be claustrophobic, but it was actually very cozy. I want to go to another one of their branch in Tokyo just to stay in and read books all day. 😀
End of 2nd day solo adventure. Third and last day will be in Nara. Talk again soon! 🙂
My new years’ resolution for 2018 was to make it my year. To find myself and be more adventurous. So before 2019 came, I decided to end the year with a bang!
One of my dreams was to visit Kyoto and see Fushimi Inari Shrine. I also wanted to try the Maiko-Geisha experience that I saw from travel blogs. That’s why I decided to spend my winter vacation exploring Kyoto and Nara by myself.
Above is my itinerary for 2 days in Kyoto and 1 day in Nara. The highlighted areas are activities and hotels paid using a credit card.
Instead of taking the bullet train, I pre-booked a return trip at Willer Express to save a few yen. Unfortunately, the only trips available were night trips around midnight. Trust me, you’ve never experienced cold until you are standing at a bus stop at midnight during winter.
I arrived at Kyoto around 5am and went to First Cabin Kyoto Arashiyama to leave my luggage before exploring the area.
Randen Arashiyama Station
First Cabin Arashiyama Lounge (7 am)
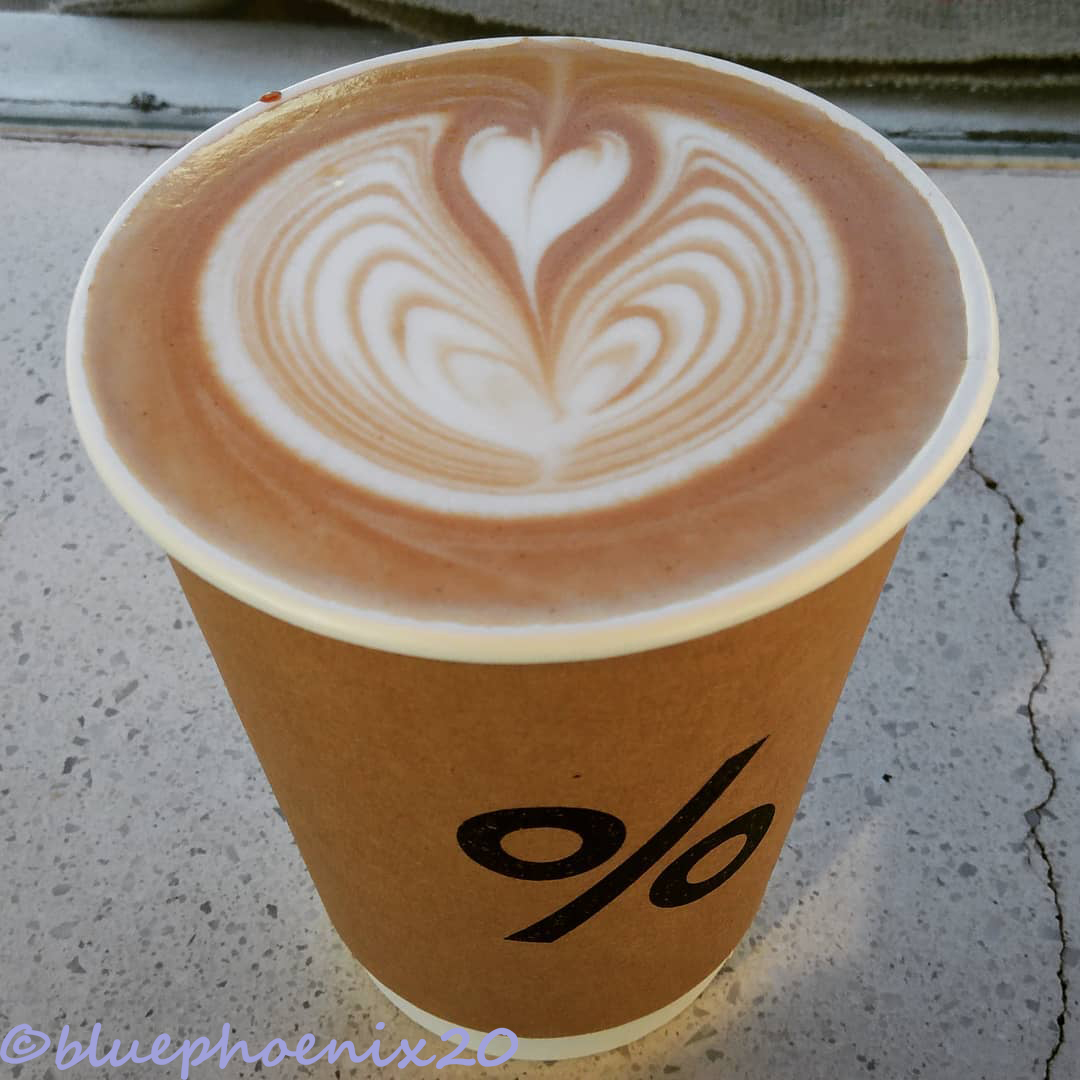
But of course, my day couldn’t begin without coffee. One of my colleague greatly recommended % Arabica Coffee. Good thing the hotel I’m staying at is near the small coffee shop. And I ordered their famous Cafe Latte:
% Arabica Cafe Latte
It tasted good, although honestly, all coffee tastes good to me. 😀
It did its job, though, of fueling my sleep-deprived body so I can get on with my planned adventures for the day. First stop, Fushimi Inari Shrine.
Going to Fushimi Inari is simple enough. Just follow the many people. LOL! But it was really crowded, especially at the base. The shrine was built on Mt. Inari, and to reach the main hall, you’d have to climb the mountain under the cover of at least a thousand red torii.
Red Torii
The good news is that the higher you go, the less crowded it becomes. There were also lots of tea shops and rest stops along the way. There were also souvenir shops on the path and at the top.
Mt. Inari Summit
It took me at least 2.5 hours to reach the top and back down again. I had to rest a lot due to asthma. But the view at the top was totally worth it. 🙂
I had lunch at a small restaurant at the base of the shrine, then took the bus to my next location: Kinkaku-ji Temple.
Unlike Fushimi Inari, which is free to the public, Kinkaku-ji has a 400yen admission fee. The very first thing you’ll see was the golden pavilion:
Golden Pavilion
The day was a bit cloudy, but I was lucky enough to witness the moment when the sun briefly peeked and made the pavilion shine. Afterwards, I took a leisurely walk around until I saw a teahouse rest stop. For 500yen, you can rest inside a tatami-floored room, and enjoy a cup of Kyoto green tea and traditional Japanese sweet.
wagashi and matcha
You had to eat the sweet first and then drink the bitter tea. It was a fun experience drinking the tea while watching the people pass through the teahouse garden.
I originally planned to go to Genkoan Temple, as suggested by another colleague, but I was very sleepy (almost 24 hours awake) that I decided to go somewhere nearer instead. I found Nijo Castle on Google maps and took the bus. Unfortunately, the castle was closed for the New Year. But, I did find an easy way back to Arashiyama via Randen tram line.
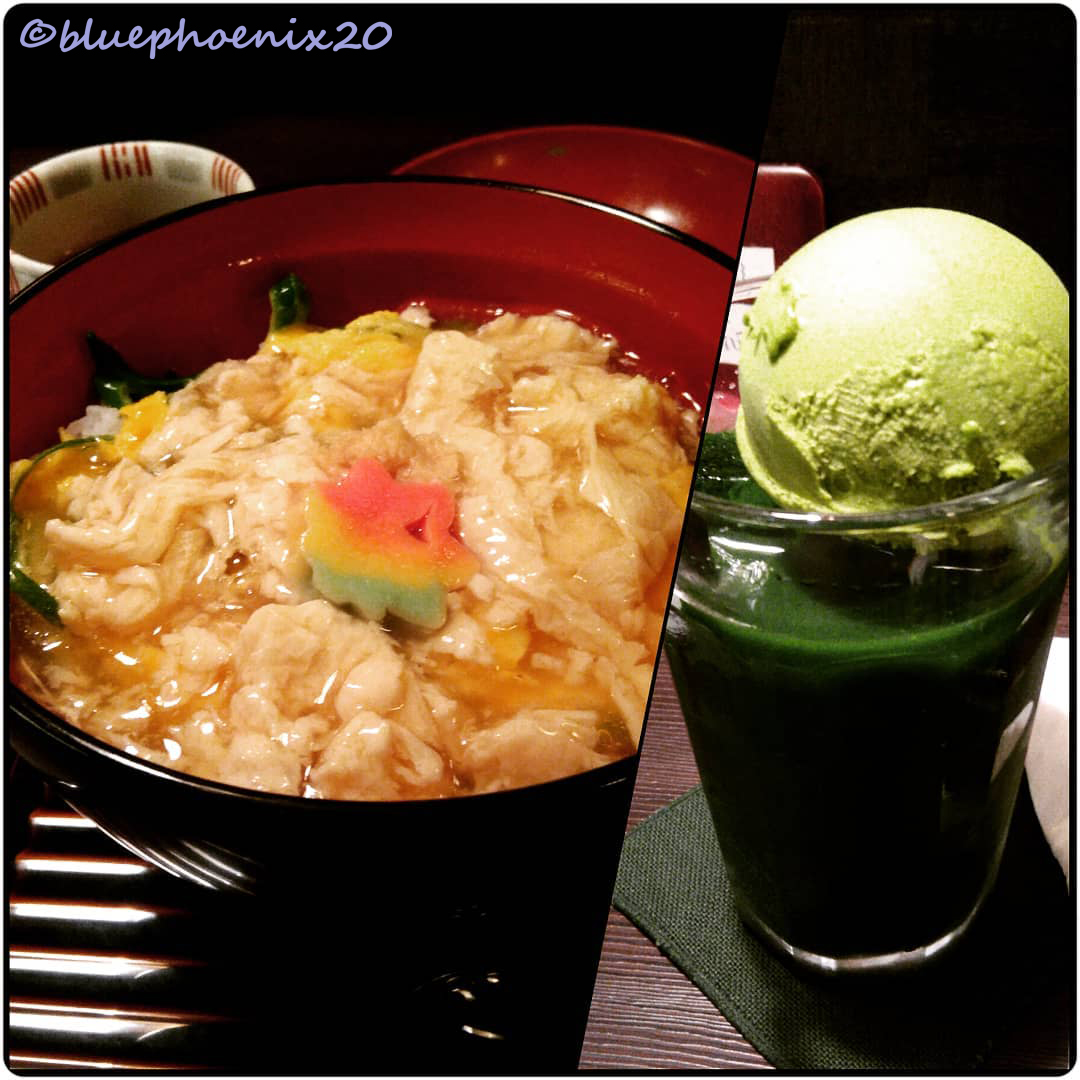
Checked-in at the hotel and went to find dinner. It was a bit difficult as most most shops and restaurants closed at 7pm. I found a cafe that was still open and tried yuba (tofu film) with egg on rice.
yuba donburi and matcha float
After dinner, I finally got to rest at my room at the hotel. Well, it wasn’t exactly a room, as First Cabin is like a capsule hotel. They offer a range of sleeping quarters depending on the traveler’s needs. I liked having big space, so I opted for the First Class Cabin for Female which is 2x2x2 meters room. Instead of doors and locks, they used curtains for privacy.
The cabin has a bed, table and TV – but you need a headset (which is included) to watch as there was a “no noise policy” in the sleeping quarters. They also provided sleep wear, towels, and toothbrush. There was a separate room for the toilet, lavatories, laundry, shower and shared bath.
9pm and I was in bed, trying to regain enough energy for the next couple of days of more activities. And that was my first adventure-filled day at Kyoto. Two more days to go. Talk again soon! ❤